


Viral Meghan Markle Pasta!
Plus Lemon Poppy Scones & Quick Giardiniera

Hi Friends!
It’s finally somewhat warm here in upstate New York! My daughter goes to an outdoor preschool, and this was the first week they could shed their winter gear and run around without snow boots and heavy coats.
I have been sprinting forward on my new cookbook, Italianish, and there has been a lot to do. Final edits! Promotional material! Proofreading! I’m so proud of how this book turned out; be on the lookout for an announcement about preorders very soon 😱😱😱
I did manage to find some time to make the controversial Meghan Markle pasta from her new show With Love, Meghan. If you haven’t seen the show, in the first episode she makes a One-Skillet Spaghetti where she pours boiling water over pasta and vegetables, rather than cooking the pasta and sauce separately. I’m sure you all know that Meghan gets an inordinate amount of hate no matter what she does, so this pasta led to headlines like this from the New York Post: “That’s not food - that’s punishment.”

Well, I decided to put the pasta to the test, and yesterday I wrote a recipe based on the dish and tried it out. My verdict: I thought the method worked great, and by cooking the spaghetti and vegetables together in a small amount of water it led to a really smooth, creamy sauce without any cream. Next time I would mix up the vegetables a bit or add chicken broth because I thought the sauce was a little bland, but overall I was a fan.
You can watch my video and see the recipe here:
https://www.instagram.com/dannylovespasta/reel/DHCIVd2xdDO/
This video has gone viral, getting almost 4 millions since I posted it last night, and literally just now as I looked up that New York Post article I linked to, I discovered that my video has been written about in the Daily Mail, Sky News Australia, IOL South Africa, and more. The Internet is a wild place!


Ok, putting royalty aside for a moment, there are three new recipes in this week’s newsletter! Read on for fun dishes things to try.
Recipes
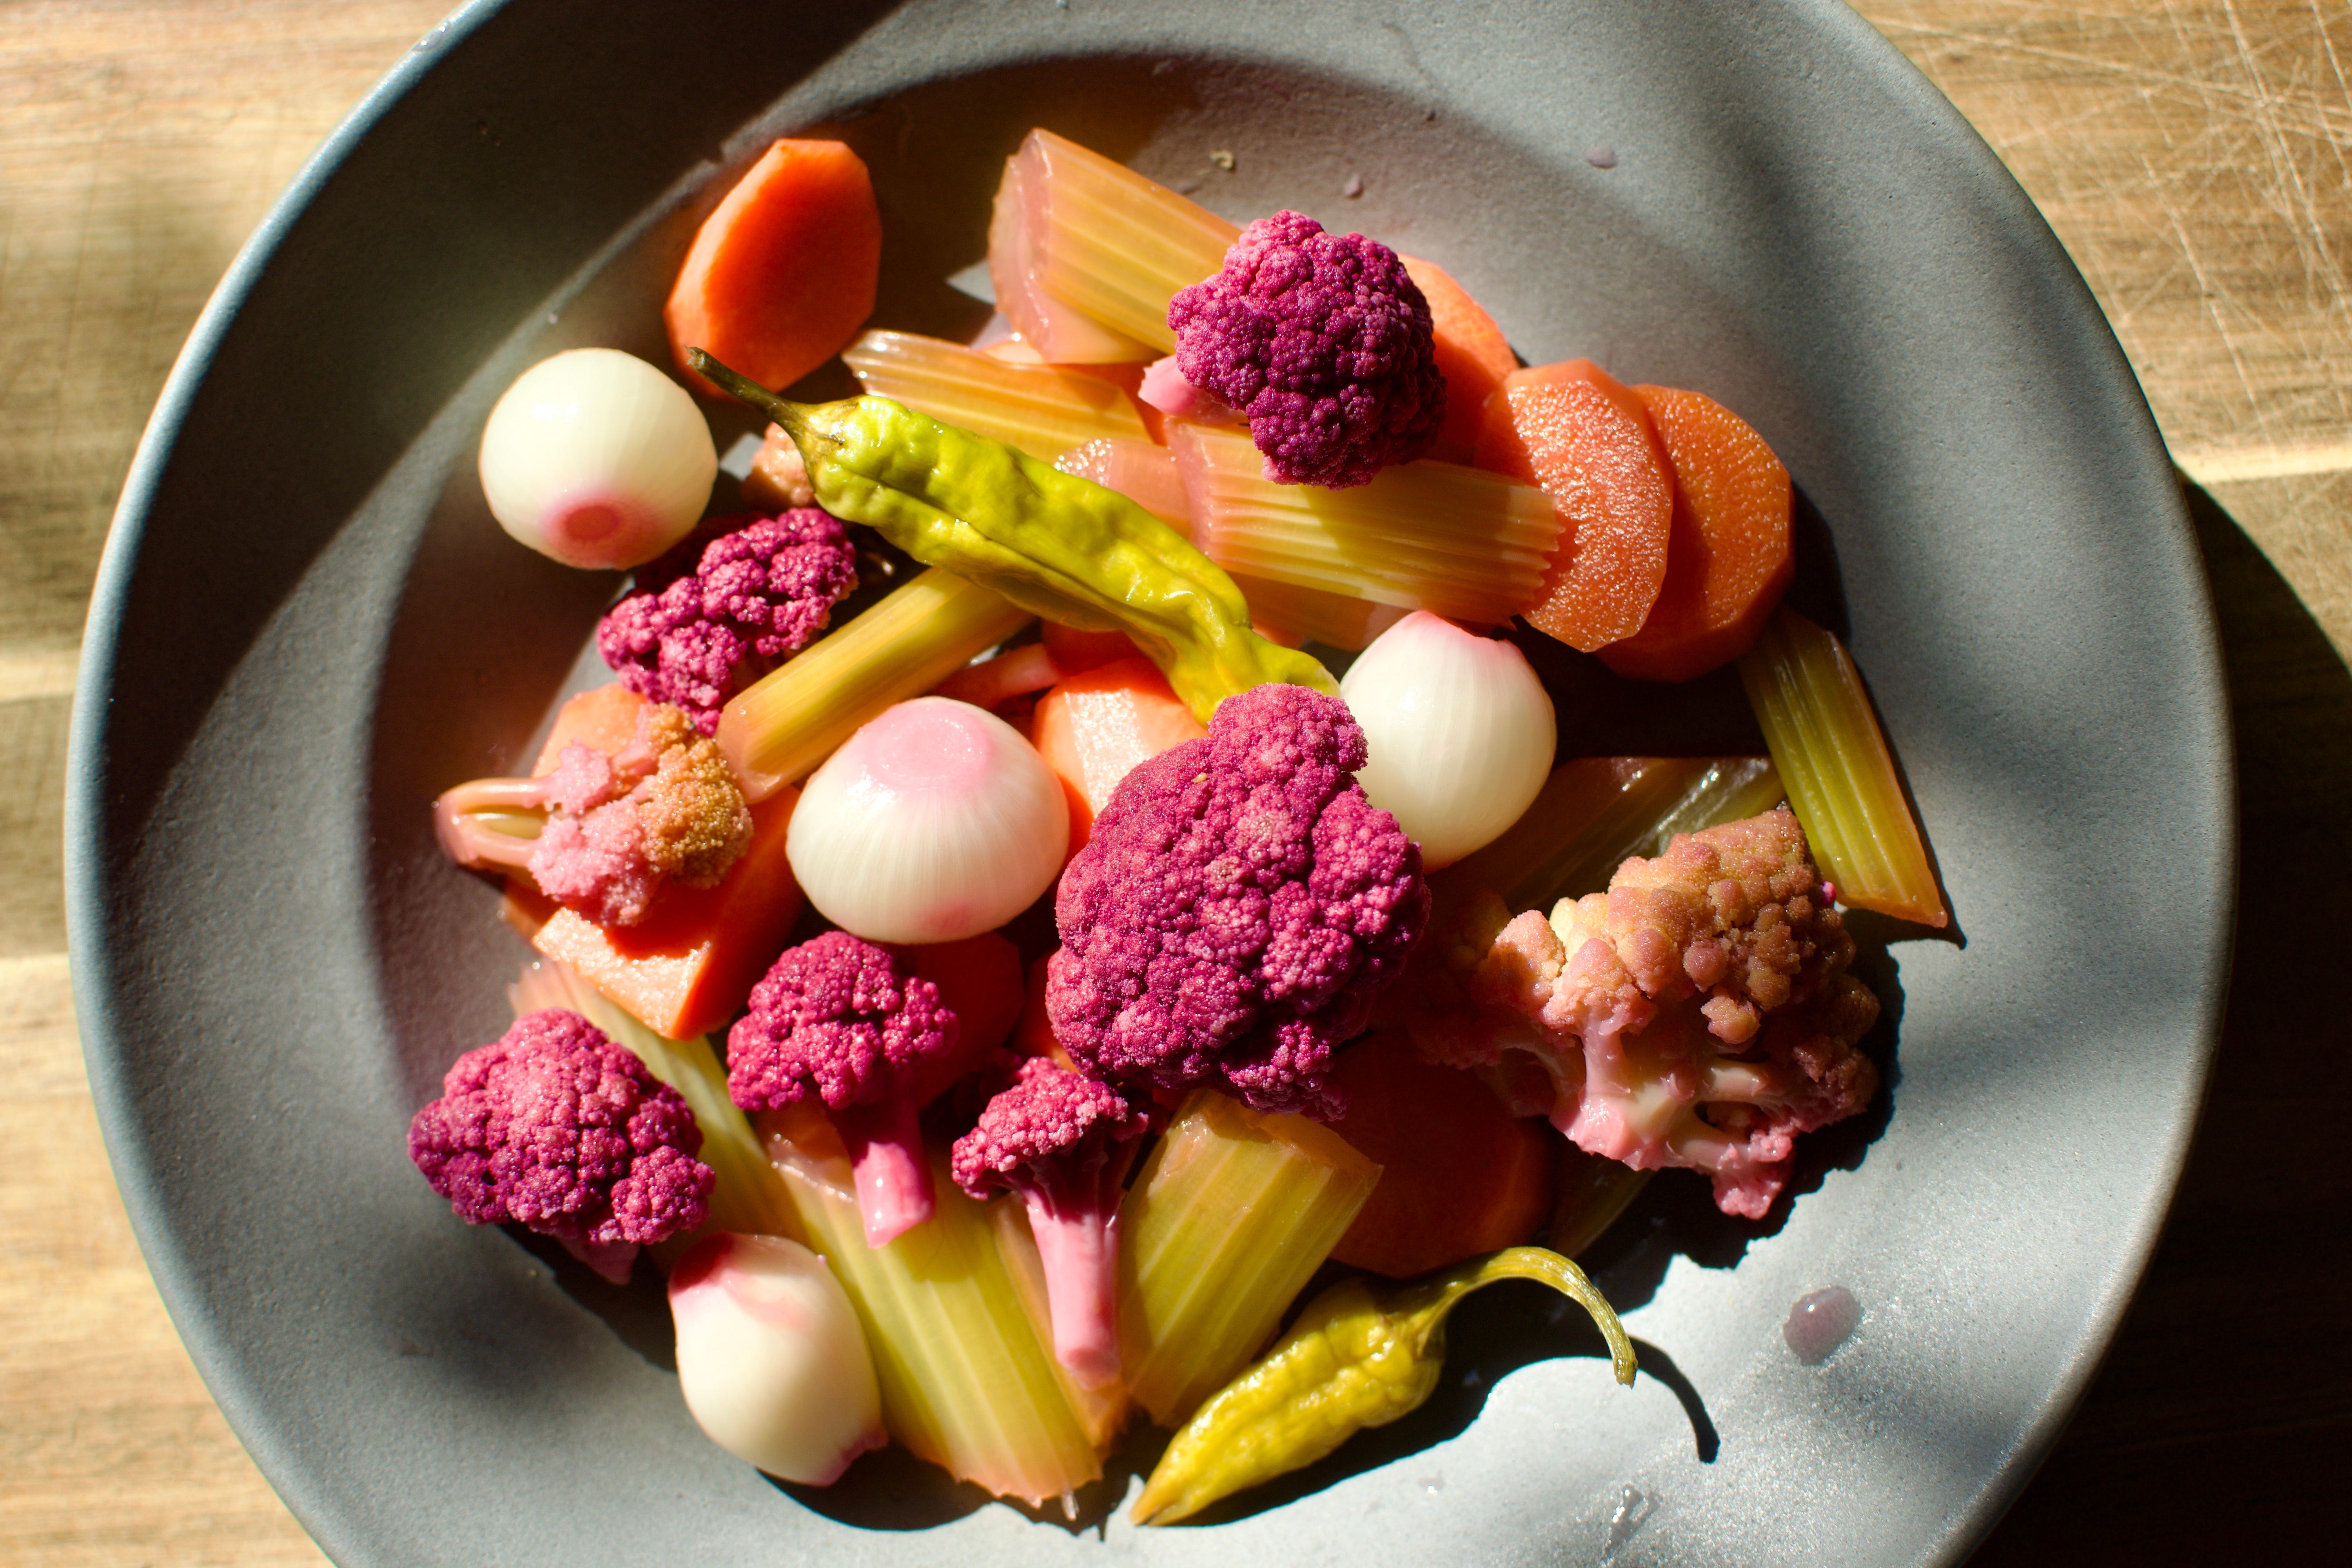
The Snack: Quick Giardiniera with Shishito Peppers
Prep Time 20 Min | Cook Time 10 Min | Makes 4 to 5 cups


Giardiniera is an Italian-American favorite, and it is a perfect topping to add to salads, sandwiches, or eaten on its own. People often buy jarred versions from the grocery store, but it is so easy to make at home! There are some recipes out their that involve canning and preserving, but you can actually make a quick giardiniera that tastes great and is ready the same day.
You can use a mix of vegetables, but cauliflower, carrots, celery, and onions are pretty standard. Green beans, olives, and bell peppers also make great additions. I add shishito peppers to mine, but jalapeno, serrano, or chili peppers also work (shishito are pretty mild and I’m kinda a wimp when it comes to spice!).
Ingredients
1 ½ cups white wine vinegar
1 ½ cups distilled vinegar
1 ½ cups water
2 tbsp kosher salt
1 tbsp sugar
1 bay leaf
1 tsp peppercorns
1 tsp celery seeds
1 tsp coriander seeds
1 tsp fennel seeds
5 to 6 whole cloves
1 head of cauliflower, cut into florets
3 celery stalks, cut into 1-inch pieces
3 carrots, sliced
8 to 10 small pearl onions
3 to 4 shishito peppers, sliced in half
Recipe
Add the white wine vinegar, distilled vinegar, water, salt, sugar, bay leaf, peppercorns, celery seeds, coriander seeds, fennel seeds, and cloves to a large pot and bring to a boil over high heat.
Once the liquid is boiling, add the cauliflower, celery, carrots, pearl onions, and peppers. Once the liquid is boiling again, about 1 to 2 minutes, remove the pot from the heat and let the vegetables come to room temperature.
The giardiniera is ready to eat as soon as it is cool. Otherwise, transfer it to an air-tight container and store in the refrigerator for up to 10 days.
The Dinner: 20-Minute Sheet Pan Chicken and Veggies
Prep Time 10 Min | Cook Time 10 Min | Serves 2 to 4

This is such an easy dinner but it’s one of my favorites to make on those evenings we get home late and I don’t have energy for more. The trick is to preheat the baking sheet in the oven while you prep the rest of the ingredients. Once you add the chicken and vegetables they will immediately sizzle, allowing them to cook quickly. You can also use frozen vegetables for this, but my advice is to thaw the vegetables in the microwave quickly and then pat them dry; if you cook them directly on the sheet pan they will release moisture and become mushy.
Ingredients
1 ½ lbs chicken breast
2 tbsp olive oil
1 tbsp paprika
½ tsp garlic powder
½ tsp salt
¼ tsp pepper
1 cup green beans
1 bell pepper, diced
½ onion, diced
Recipe
Preheat your oven to 475°F. Place a baking sheet in the oven as soon as you start preheating so it heats up as well.
Pat dry the chicken, then cut it into 1-inch pieces. Place the chicken in a large bowl and add the olive oil, paprika, garlic powder, salt, and pepper. Toss and then add more spices if necessary to ensure the pieces are all coated.
Once the oven is hot, carefully remove the baking sheet and spread the chicken on it. Add the green beans, pepper, and onion, being careful not to cover up the chicken.
Cook in the oven for 10 to 15 minutes, or until the chicken is cooked through. Remove from the oven and serve.
The Dessert: Lemon-Poppy Scones
Prep Time 20 Min | Cook Time 15 Min | Makes 8 scones
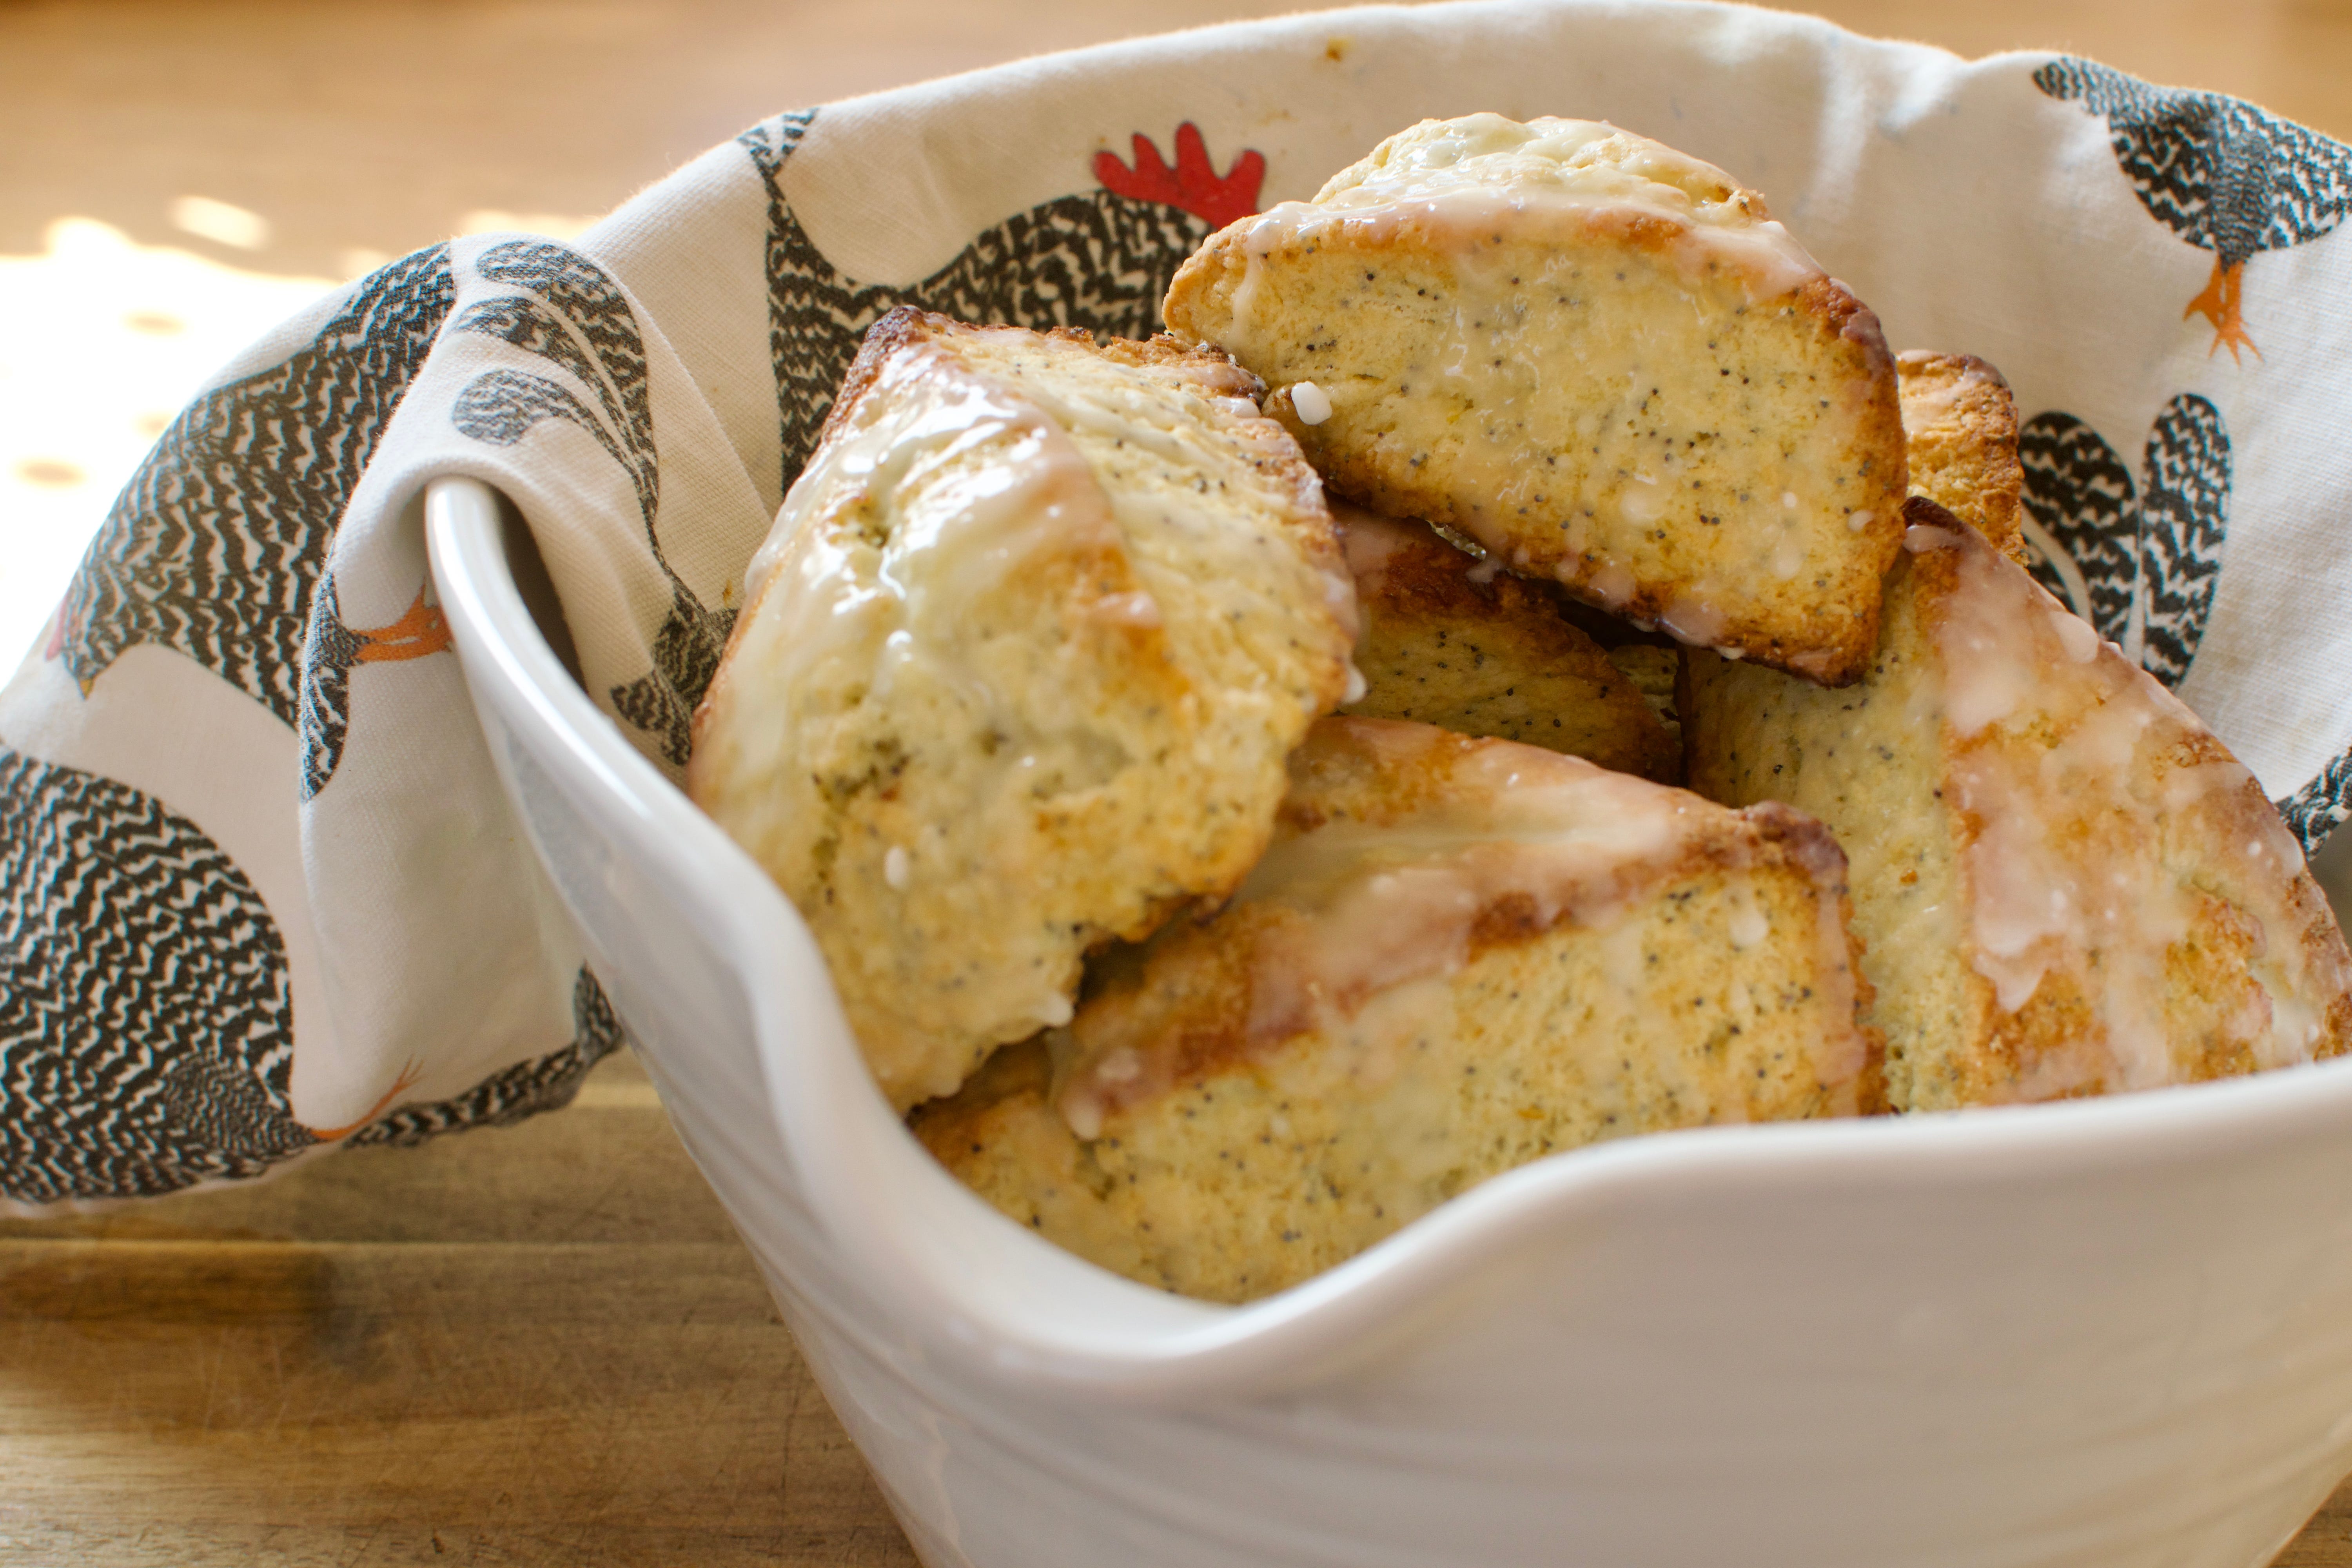
I love the lemon-poppy combination, and for a while I’ve been mulling a lemon-poppy recipe for this newsletter. A muffin? Cookie? Pie? Finally it hit me: A Lemon-Poppy Scone! They’re so cozy, and although they contain sugar, they barely even count as a dessert. I mean, people eat them for breakfast!
My best scone advice is to use very cold butter, and try to overwork the dough or the scones will be tough. You have to “cut in” the butter like you do with pie crust; you can find videos online on how to do this, but basically once you combine the flour and butter you want to break the butter up into pea-size pieces.
Ingredients
2 cups all-purpose flour
1/3 cup sugar, plus more for dusting
1 tbsp baking powder
½ tsp salt
½ cup (1 stick) cold butter
1 tbsp poppy seeds
1 egg
½ cup cream, plus more for brushing
Zest from 1 lemon
For the glaze
1 cup powdered sugar
1 tbsp butter, melted
Juice from 1 lemon
Recipe
Combine the flour, sugar, baking powder, and salt in a large bowl.
Cut the butter into small cubes or grate the butter using the large holes of a box grater. Cut the butter into the dry ingredients. Do this with a pastry blender or by running two knives through the bowl to cut the butter into small pieces. You can also use your hands to break up any large chunks of butter. Break up the butter until the largest pieces are about the size of a pea, but be careful not to overwork the dough. Mix in the poppy seeds.
In a small bowl, whisk together the egg, cream, and lemon zest. Add the wet ingredients to the dry ingredients and mix them together just until they are incorporated; be careful not to overwork the dough or the scones will be tough. At this point the dough should be very loose and crumbly.
Pour the dough onto a floured surface and pat it together into a rectangle about 1 ½ inches high. It will still be loose and you will have lots of floury bits that do not stick together. Fold the dough in half, then pat it back down into a rectangle about 1 ½ inches high. Add any dry bits to the top of the dough, then fold it in half again. Do this 5 to 6 times until the dough is more cohesive; we are creating layers that will help make the scones flaky and light.
Pat the dough into an 8-inch circle, then cut it into 8 wedges. Line a baking sheet with parchment paper and places the scones on top. Lightly brush the top of each scone with cream and then dust on sugar.
Preheat your oven 425°F, then place the baking sheet in the freezer while the oven heats up; this will help them keep their shape.
Bake the scones for 14 to 16 minutes, until the tops start to turn golden brown. Let them cool on the baking sheet for about 5 minutes, then transfer to a cooling rack,
While the scones are cooking, make the glaze. Combine the powdered sugar, butter, and lemon juice in a bowl. If the glaze is very thin, add more powdered sugar.
Once the scones have cooled for about 10 minutes, spoon the glaze on top of each one. Let the glaze harden, then serve.